
Subscribe
Be the first to know about our latest posts.
-
Service
Partners -
Sub-Service
data engineering services, cloud engineering services, AWS
Explore Icreon’s Ecommerce Solutions

Efficient Elasticsearch Indexing: Managing Over 10 Million Records with Speed
What is considered a large dataset? A million records used to be a high number a few years ago. But, in the new data heavy world, we are seeing datasets that have grown by orders of magnitude. The ability to quickly index and search through tens of millions of records has become a necessity. The systems and means that handle heavy datasets have been evolving as well.
How long does it take to index 10M plus records into Elastic Search application hosted in AWS? If we use the right approach and right tools, it can take only a few minutes. We achieved speeds of 8000 records per second or better to index data residing on AWS ecosystem into the Elastic Search application deployed onto AWS cloud within the same region.
Below is a cutting-edge methodology for indexing massive datasets into Elasticsearch within minutes, a feat once deemed aspirational. The source code and configurations are shared as appropriate.
The Challenge at Hand
Imagine the scenario: Your organization needs to download and index vast amounts of data from multiple large RAR archives into the Elasticsearch application on the AWS Elastic Cloud service. The best way to navigate these challenges would be to first download multiple large RAR archive files from a third-party website into AWS-S3 and index the CSV files into Elastic Search application within Elastic Cloud service deployed on AWS.
Parameters & Constraints
1. Input CSVs containing roughly 20 million records spread across in multiple different files (as part of the case-study, focus will be on loading only the largest file with 18.5 million records)
2. The file sizes are 15GB for data files and 250GB for the associated image files database. The CSV data files have many multi-line text fields with complex html data
3. Using Elastic Cloud deployment on AWS Cloud
4. All required tools and services leverage the AWS Cloud framework
5. Be as efficient as possible with AWS resources while not losing value (there is never any need for wasting valuable cloud resources)
High Level Approach
Below block diagram shows different components involved in the process.
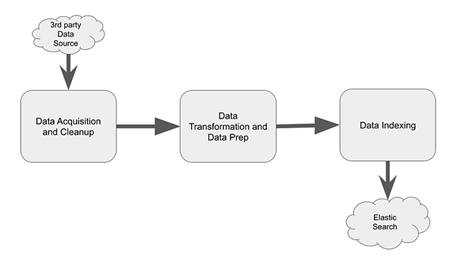
Data Acquisition and Cleanup
Transferring large files across the internet presents unique challenges, especially when moving them to and from cloud systems.Corporate intranets make this task look quite easy, but there are many interesting challenges in doing this across open internet websites especially to and from cloud systems. Some intricacies of large file movement and data cleanup are discussed in this article. The AWS ecosystem is used in this case-study; however, the challenges would be similarly resolved on GCP environment as well
Data Transformation and Preparation
Leveraging AWS Glue Service, we transform CSV data into JSON Lines format, making it perfectly suited for Elasticsearch. AWS Glue Service was chosen as the tool to transform the CSV data into JSON Lines format such that it is readily usable by the elasticsearch-py python package. While there are many ways to do this, AWS Glue Service provided to be the best option to transform data to usable JSON format. The alternatives will be discussed in the subsequent sections too.
Efficient Data Indexing
Indexing vast datasets into Elasticsearch doesn't have to be a time-consuming process. By utilizing the parallel_bulk loader option within the elasticsearch-py package, we achieve unprecedented indexing speeds. The parallel_bulk loader option within the elasticsearch-py python package was utilized to load the JSON documents into the Elastic Search application. The details of the python library will be discussed in latter sections.
Data Acquisition and Cleanup Process Explained
Moving files in and out of SAN mounted corporate network nodes is easy. However, in the new era of cloud, the files need to be saved and operated from the cloud environment and the source files may need to be acquired from a third-party network that resides outside the cloud environment.
Alternatives
1) Download files to local, clean locally, and re-upload to cloud
2) Spin up a temporary cloud instance in the same region as S3 to process
Approach-1 works great for sample files of small sizes where one might want to quickly test things. However, this stops scaling once the file sizes cross 50MB (maybe, 100MB). To deal with large files, especially in the range of 15GB to 200GB, the second approach is better suited. AWS gives great speeds when moving files in the same region, so it is important to spin up the instance in the same region as S3 to take advantage.
STEP-1: Download files from third party to EC2 instance
A simple wget command can be used to download files from a third-party website as below. Note the use of option --ask-password as opposed providing password in-line to prevent your password being saved to history.
wget -o local_file.rar --user=
https://www.dataproviderurl.com/some_folder/remote_file.rar
nohup wget -o local_file.rar --user=
https://www.dataproviderurl.com/some_folder/remote_file.rar
Don't forget to disown the job above
STEP-2: Data Cleansing
This can be a very easy or very hard job depending on the quality of incoming data. While this can be a broad topic, there are couple of things to watch out here, especially the encoding of the incoming data can throw lots of curve balls if not handled properly. Let’s review this in particular.
The challenges with encoding can get worse if the data provider does not indicate what encoding the text data is in. When python code is written to deal with UTF-8 formatted strings and if we feed UTF-16 formatted data to it, it will throw errors, or worse, process data incorrectly without throwing any errors.
If the source encoding is not known, the UnicodeDammit package from BS4 (Beautiful Soup-4) can do wonders for you. Create a sample text file (of 100K lines) from the full file and use the python excerpt below to figure out the source encoding.
with open("sample_file_with_unknown_encoding.txt", 'rb') as f: incoming_text = f.read()
parsed_text = UnicodeDammit(incoming_text) print(parsed_text.original_encoding)
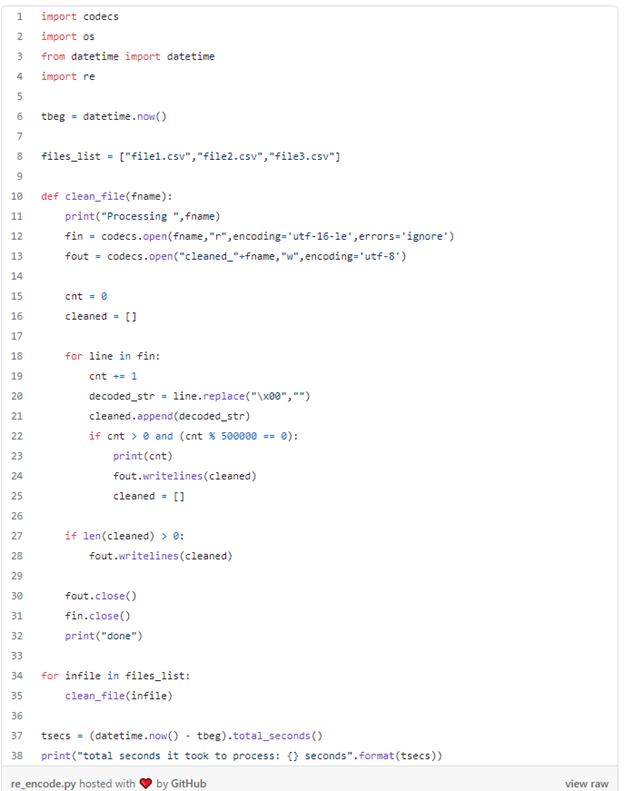
Once you know the source coding, you can optionally convert to required data format (UTF-8 in our case) using code below-
STEP-3: Move files to S3 bucket
Once cleaned and re-encoded, move file to S3 bucket.
aws s3 cpNow, we are ready to move to next step.
Data Transformation and Data Preparation Process Explained
Data Transformation goal was to be able to transform and prepare data so that it is readily usable by the indexing program.
Alternatives Considered:
- Use CSV files as-is
- Transform CSV files into JSON format
CSV file could have been used on an as-is basis to serve as input to the indexing function, but consider the following limitations-
1. If indexing only light text fields (omitting heavy text fields), it is unnecessary to load the large size CSV text file into your processing environment (this can significantly slow down your indexing process)
2. CSV files are not very convenient when joining multiple files into a common schema (relational key lookups). The run-time key lookups can be done but will significantly impact the load times.
Due to the above limitations, AWS Glue Service was chosen to create the JSON documents with all the fields we needed. Since AWS Glue jobs take a very short time, this is far more convenient and efficient than wrangling the CSV files at run-time.
One thing to remember, since AWS Glue runs by spinning up parallel partitions (because of Map-Reduce), it will create multiple partition files as output. So, you will need a way to put them together for efficiency or you can use multiple partitions too. Stitching all partitions back into one single JSON lines file helped achieve better run-time efficiency.
AWS Glue Service — Setup and Execution
For the AWS Glue Service, the data files were assumed to exist in an S3 Bucket. To run the AWS Glue Service was set up and run through the Glue Studio.
STEP-1: Setup ETL Job in AWS Glue Studio
Launch Glue Studio from AWS Glue Service
- Click on ‘Create and manage jobs’
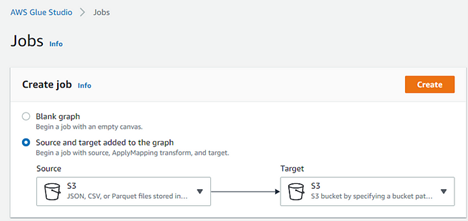
- Choose Source and Target added to the graph with Source and Target pointing to S3 (refer to screenshot below) and Create Job
- Click on Data Source block and setup S3 Source with following parameters (refer to screenshot below)
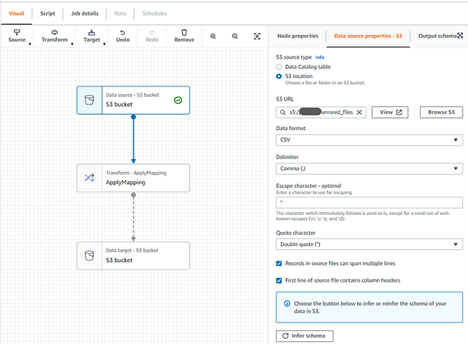
- Click Infer Schema to let AWS Glue get the the CSV file structure into Schema definition (edit inferred schema as required)
- Next, click on the Transform block and set up the fields that you need to keep. Here you can drop the fields you don’t need (such as long text fields)
- Set up where to write the files by clicking the Data Target block — make sure to choose JSON as output format and no need to write to Data Catalog as this is a one-time job (refer to screenshot below)

- Set up the job details — make sure to create/use an IAM role that has access to read/write to S3 buckets (refer to screenshot below)
- Also, choose G.2x for worker type and language as Python 3 (you could choose Scala also) and enable and 10 workers should give you pretty decent performance for large jobs.
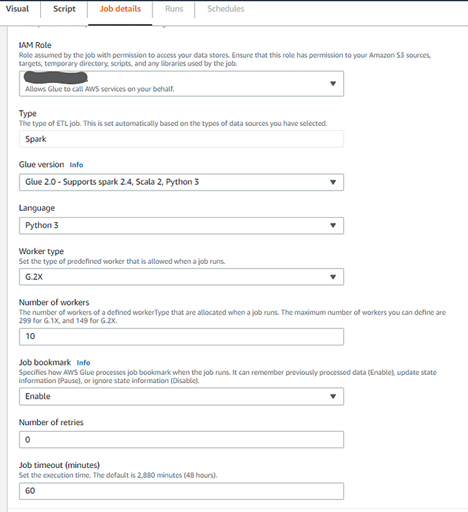
- Finally, Save and Run the job (it processed 18.5 million records in under 1 minute which is awesome performance. AWS Glue spawned roughly 180 different partitions in the pyspark while running this job. The massive parallelism is what contributes to the speed and one of the reason AWS Glue was chosen as our go to ETL tool.
Indexing Data Into Elastic Search Application Process Explained
Now that the data has been transformed into a format that can be readily consumed, time to start working on the final step to index this data into the Elastic Search Application.
Prepare Data Files
Though the files generated by AWS Glue in the previous step can be used as-is, stitching together all the JSON partitions into a single file brings lot more efficiency to the python generator function. This was accomplished through a simple python script (source code for this script is as below). The shared code excerpt provides option to only grab first 100K lines for testing purposes by tweaking the TOTAL_LINES parameter.
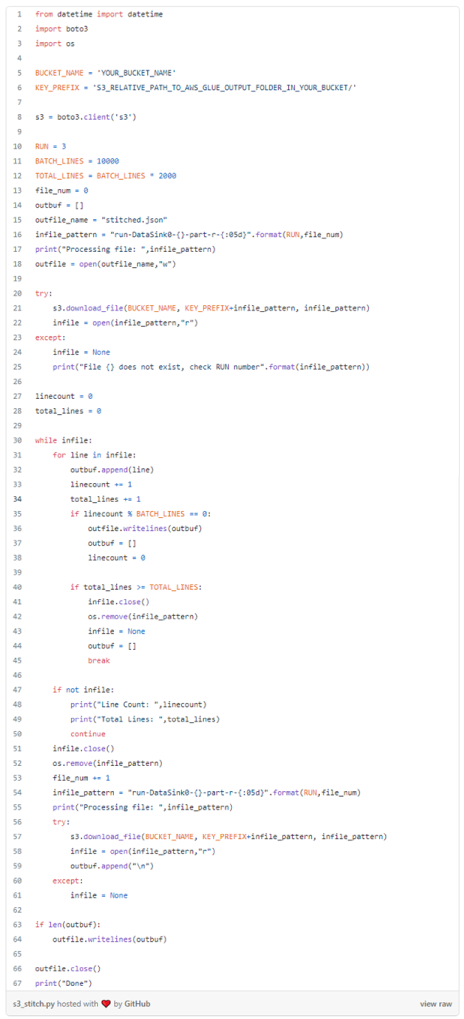
The above script stitches all the files directly from S3 bucket location and creates a local file called stictched.json which will be used to create search index.
Indexing Documents
There are couple of different alternatives you can use to index documents into Elastic Search hosted on Elastic Cloud (the version used for this case-study was 7.12, so you may want to check for any limitations for the version that you are deployed on).
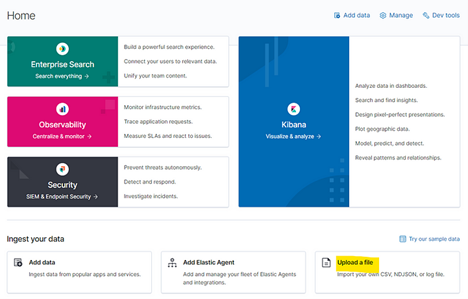
1) CSV File import
You can use Kibana interface to directly upload file, validate data, and import to create index on Elastic Search (refer to screenshot below), however, this has a file size limit of 100MB which is grossly insufficient for our needs of 13GB file with 18.5 million records.
2) Use Log Stash Interface to Load Index Data
This is an ideal scenario when you are updating indices or re-indexing the document and need much greater granularity to create/update/delete/re-index document as needed.
A different article will cover this in greater detail.
3) Use Python Library Provided by Elastic Search
This is a very useful method to load the one-time indexing into Elastic Search app. This case-study will focus on this method for loading documents into Elastic Search index.
There are few steps to cover here.
- Create a user with create_index permissions (refer to screenshot)
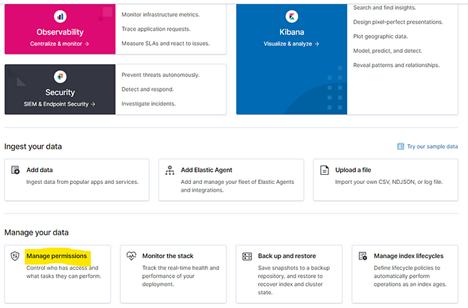
- Make sure no index exists with the index_name that you are creating (either delete the index being created or choose a new name as appropriate, be careful when deleting existing indices)
Start indexing with the above credentials (with create_index permissions). Refer to code gist below.
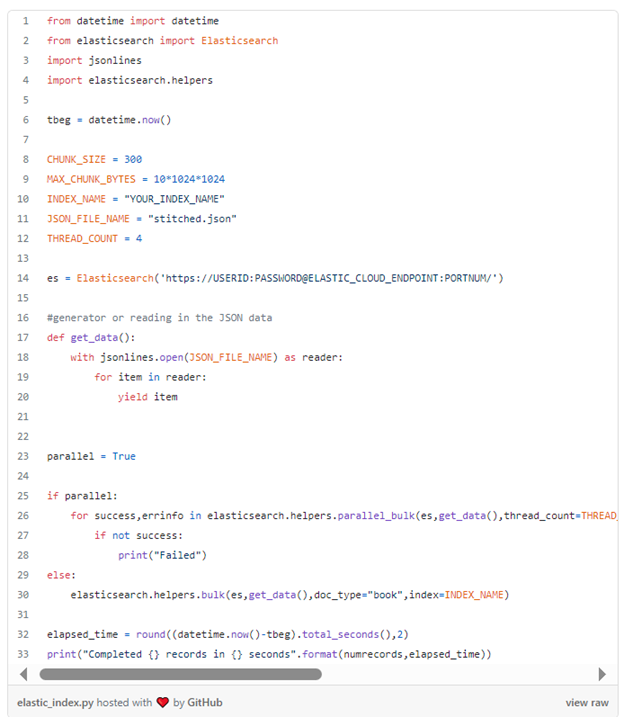
Configuration used for running the above code
- AWS-EC2 (t2. medium with 2 vCPU and 4GB RAM + 40GB storage space)
- CHUNK_SIZE is set to 300 (this was optimal for the above configuration)
- CHUNK_MAX_BYTES is set to 10MB (again optimal for above config and our data type, this may vary for different data types, need to find an optimal balance here)
- Although the data file size exceeds 10 GB, the use of generator in python takes the need away from loading any data into RAM which is maximally used by the indexing process rather than storing source data.
- Finally, you will notice the parallel flag in the gist above. elasticsearch library does provide a bulk option (where the set of records are processed in one shot) OR cutting the whole data into different chunks and then processing each chunk as a bulk. The second option was used for this case-study by setting parallel=True but the code for first option is left there for experimentation
Performance
The above code processed the entire 18.5 million records in under 40 minutes. This can further be optimized by using Log Stash interface or spinning up a bigger instance.
Testing and Verification
Once indexed, the integrity and accessibility of your data are paramount. We guide you through the process of testing your Elasticsearch indices, ensuring your data is ready for real-world applications.
Once you have the end point for Elastic Search, the simplest way is to use the cURL command below-
curl -X GET "https://SAERCHUSER:PWD@ELASTIC_CLOUD_ENDPOINT:PORTNUM/INDEX_NAME/_search?q=And it should respond with some JSON formatted search results. Voila!!
We're Here to Help
Lastly, we are here to help if you are facing a specific problem that may not be addressed above. We have built years of expertise solving many tough challenges in many different scenarios. We specialize in solving impossible problems and love taking on tough challenges. If you have any questions, feel free to reach out to us, we’d love to help.